Friday 14 October 2011

Password RECOVERY Console


The password recovery software(download link given blow)
helps u 2 recover u r password
Adobe Acrobat Password Recovery Key
Advanced Archive Password Recovery
Advanced RAR Password Recovery
Advanced ZIP Password Recovery
Messengers Password Recovery
Office XP Password Recovery
Dialup password Recovery
MSN Password Recovery

http://rapidshare.com/files/17830985/Passr.rar

Password : mechodownload

Create Your Own Logon Message


1 Click start 
click run
type regedit, 
then click ok!

2 In The registry editor, drill down to the following key:
hklm\software\Microsoft\Windows NT\Current version\Winlogon.

3 Right click LegalNoticeCaption, 
click modify, 
Type: THIS IS NEXT TRICK,and then click ok!

4 Right click legalNoticeText, 
click modify, and then Close your message!

5 Restart Your Computer.

6 The message will appear every time you logon!

Chat With Command Prompt


If you want personal chat with a friend
you don't need to download any yahoo messenger
All you need is your friends IP address and Command Prompt.
Firstly, open Notepad and enter:
@echo off
:A
Cls
echo MESSENGER
set /p n=User:
set /p m=Message:
net send %n% %m%
Pause
Goto A
Now save this as "Messenger.bat". Open the .bat file and in Command
Prompt you should see:
MESSENGER
User:
After "User" type the IP address of the computer you want to contact.
After this, you should see this:
Message:
Now type in the message you wish to send.Before you press "Enter" it should look like this:
MESSENGER
User:27.196.391.193
Message: Hi
Now all you need to do is press "Enter", and start chatting!

Reverse the mouse buttons


1) No context menu

What will you see when you right click on the desktop? You will see a context menu which says arrange icons, refresh,..and so on. Are you angry at your friend for not wishing you for you B'day? Do you wanna play a trick on a newbie in your family who is new to computers? This is a cool trick to play. By this tweak, you will be able to disable the right click on the desktop or any icons/files/folders/applications... But right click will work on taskbar of the start button and registry. So, dont worry!!! 
Open your registry and you will see all unknown files like HKEY_CLASSES_ROOT....... and so on. Don't panic. Follow this path. HKEY_CURRENT_USER>SOFTWARE>MICROSOFT>WINDOWS>CURRENT VERSION>POLICIES>EXPLORER. On the right side of the registry, you will see two files(in general) named 'default' and 'NoDriveTypeAutoRun'. Right click on the empty space in the registry and goto New>DWORD VALUE and name it as "NoViewContextMenu". Remember, no spaces and N,V,C,M should be capitals. Right click on this and click modify. The default value will be 0. Change it to 1. Note: DONOT CHANGE THE HEXADECIMAL TO DECIMAL. Click OK. Close your registry and logout. Bingo!!! Once you login again, right click wont work. Your friend will be perplexed and the next thing he/she does is call the system administrator not knowing that not all system administrators will be knowing about registry. Now, to enable it again. follow the same path and set the value to 0. Logout and then login to see the effect.

2) Reverse the mouse buttons
This is a cool trick to play on newbies. Actually, there are two ways to do this. One is changing the settings in the Control panel and the other is through editing registry. You can do it either way. But I prefer the second way, which is challenging. 
(i) Through Control Panel - goto Start> Control Panel> Printers and other hardware> Mouse. In Button configuration, enable the switch primary and secondary buttons option and click OK. But remember, you have just swapped the mouse buttons. So, for OK, you have to click the right mouse button. The newbie will be perplexed. Well, this trick is good for left handers.
(ii) Editing the registry - By default the left mouse button is the primary and the right is secondary. Open your registry and follow this path:
HLEY_CURRENT_USER>Control Panel>Mouse and on the right side of the registry, create this String value(REG_SZ): 'SwapMouseButtons' and set its value to 1. Bingo!!! You are done. Log out/Restart the computer. 

You can try this: Combine tricks 1 and 2. That means, this will result in swapping of the mouse buttons and disabling the left click(once the buttons are swapped). User is ready to call system administrator cuz he feels that the system is behaving wildly.

Disable CD Burning


Exciting isn't it?

The user can't burn any CDs by this trick. This restriction will disable the use of the inbuilt CD recording functions of Windows.

Open your registry and follow this path: HKEY_CURRENT_USER>Software>Microsoft>Windows>Current Version>Policies>Explorer and
create this key: "
NoCDBurning" and set its value to 1. Close you registry and logout/restart your system for the change to take the effect.

Tuesday 11 October 2011

Install Windows Xp....(PART-2)


Install Windows xp....(part 2)


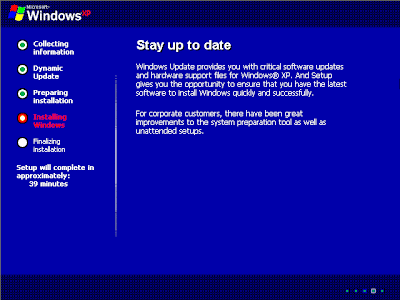
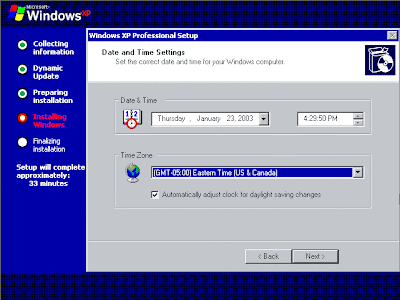
The majority of this setup phase requires no user intervention. The screens contain a description of Windows XP features. I can only assume they were created in an attempt to kill the time while XP installs and provide a general time to completion reference. I've placed a red border around those screens that require user input. The others are here simply because some TEG visitors have asked me to make them available. 
An Exciting New Look

Try The Easiest Windows® Yet


Stay Up To Date


Your Computer Will Be Faster and More Reliable


Get Support for the Latest Hardware and Software


Easily Move Documents and Personal Settings To A New Computer


Surfing the Internet; Safe, Fast, and Flexible

Explore Your Creative Side with Photos and Videos

The first screen that requires any user input in this phase is Regional and Language Options. If you're using English and you do entry via the keyboard the defaults will suit you fine.

Somehow, typing my name and my company name doesn't exactly give me a warm fuzzy sense of personalization, but that's what the Personalize Your Software screen wants you to enter. I guess you could give some bogus information if it sends a little thrill through you to pull one over on Microsoft.


The screen everybody loves to hate; the dreaded Your Product Key screen. The XP installation process stops here if you don't have one, so for those of you leaving at this point, have a good day.

Installation is going to automatically assign a computer name in the Computer Name and Administrator Password screen. Once you see the name it chooses you'll be grateful it can be easily changed. The important part of this screen is the administrator password. All the begging and pleading in the world can't make you choose something that's hard to guess, but just remember that this one single choice you're making right now is the key into everything you hold near and dear (and private) in the world of computing. It's also essential you remember the password, even if you aren't a case sensitive type of guy/gal.
Unless you prefer to live in the past or future, Date and Time Settings should be set current.
Music and Entertainment Just Got Better


In Network Settings, unless you have a good reason for selecting Custom Settings, go with the Typical Settings. No matter how special you might think your setup is, in most cases it will function perfectly well with the typical settings.

If you're a domain member, this is the time to speak up, or at least type the name of the domain. More than likely you'll do just fine being a part of a workgroup. You can leave the name 'WORKGROUP' if you want, but why not avail yourself of one of the few places in the XP setup where you can actually express some creativity. Note: Changing it to 'MYWORKGROUP' is not expressing creativity.
Windows Movie Maker Makes It Easy and Fun

 
Work Anytime, Anywhere

 
Windows XP Is Great for Notebook Computers


Stay Connected With Colleagues, Customers, Friends, and Family


The Most Dependable Windows for Business Computing

Experience the Ultimate in Safety, Security, and Privacy


Be Assured of Greater Accessibility

Now It's Easier To Get Help -- And To Help Others !

Enjoy Using Windows® XP!


Windows XP Professional is Loading


your computer and will automatically restart when finished. When the Display Settings dialog appears, click OK.


When the Monitor Settings dialog box appears, click OK.


The final stage of setup begins. On the Welcome to Microsoft Windows page, click Next.

On the Help protect your PC page, click Help protect my PC by turning on Automatic Updates now. Then, click Next.
Windows XP will then check if you are connected to the Internet.
If you are connected to the Internet, select the choice that describes your network connection on the Will this computer connect to the Internet directly, or through a network? page.
If you’re not sure, accept the default selection, and click Next.
•If you use dial-up Internet access, or if Windows XP cannot connect to the Internet, you can connect to the Internet after setup is complete. On the How will this computer connect to the Internet? page, click Skip.
Windows XP Setup displays the Ready to activate Windows? page. If you are connected to the Internet, click Yes, and then click Next. If you are not yet connected to the Internet, click No, click Next, and then skip to step 24. After setup is complete, Windows XP will automatically remind you to activate and register your copy of Windows XP.
On the Ready to register with Microsoft? page, click Yes, and then click Next..

On the Collecting Registration Information page, complete the form. Then, click Next.

On the Who will use this computer? page, type the name of each person who will use the computer. You can use first names only, nicknames, or full names. Then click Next.


On the Thank you! page, click Finish. 


welcome screen appear and see your first desktop. 


remove windows xp from cd/dvd drive and restart your pc .Install all yourmotherboard drivers like, sound, vga, lan...etc


To change start menu button right click on task bar > go to properties


it open task bar and start-menu properties
click on start menu > classic start menu> apply> OK

Install Windows Xp.....(PART-1)


Install Windows Xp.....(PART-1)


Installing Windows XP can take up to one hour. To make the process more manageable, it has been broken up into several sections. When you are ready, install Windows XP.
•    Floppy Drive
•    Unpartitioned and Unformatted Hard Drive
•    CD ROM Drive
•    Keyboard
•    Mouse
•    Network Interface Card
•    SVGA Monitor
•    Windows xp cd

1.Insert the Windows XP CD into your computer (DVD/CD-ROM) and restart your computer.


2. If prompted to start from the CD, press SPACEBAR. If you miss the prompt (it only appears for a few  seconds), restart your computer to try again.Windows XP Setup begins. During this portion of setup, your mouse will not work, so you must use the keyboard. On the Welcome to Setup page, press ENTER.

3. Almost immediately after Windows setup begins the screen shown to the left will appear. Unless you have the very latest in hardware you probably won't need to press the F6 key to install and SCSI or RAID driver. However, when XP is first installed it tries to determine what type of BIOS is available on the computer. Newer systems have what is known as Advanced Configuration and Power Interface (ACPI) capability. Unfortunately, XP doesn't always recognize a computer BIOS is ACPI capable and doesn't install the support for ACPI. Pressing F5 at this point allows you to select the proper HAL. A full description of the process is here.


4. Once the initialization process completes, the screen in Figure 03 loads to guide the XP installation process. More than anything, this screen is a fork in the installation road. This guide deals with a clean install and to accomplish that goal select the first option by pressing Enter. If you wanted to use the Recovery Console with an already completed XP installation, pressing R would be the proper choice. F3 ends the current installation process. After pressing Enter, setup will search the drives for an existing XP installation.

5. Pretty much any way you go at an installation anymore you're going to run into the Windows XP Licensing Agreement, better known as the End-User License Agreement or EULA, shown in Figure 04. Press F8 if you agree to the terms or press Esc and start researching alternative operating systems if you don't agree. There's no middle of the road.

6. Since you agreed to the terms of the EULA in the previous step, and because this is a clean installation from an upgrade version of XP to an unpartitioned and unformatted hard disk, the screen in Figure 05 appears asking you to verify you qualify to use the upgrade product. Of all the XP installs I've done I could count on two hands the number of times they have been done from full version CD's rather than upgrade CD's, so it's pretty likely you'll see this screen. The qualifying products are listed on the screen. Replace the XP CD with the qualifying product CD and press Enter.


7. Once Microsoft is convinced you've agreed to the EULA and qualify to install the upgrade version, the screen in Figure 06 appears where you choose a drive and partition on which to install XP. For those familiar with prior Windows operating systems, this section of setup is equivalent to FDISK when a clean install is being performed. In this example, since there is only the one hard disk it will be used to create the install partition by pressing C.

8. Once the partition creation has been initiated, the screen in Figure 07 opens and prompts for the size of the partition that will be created. As long as you adhere to the minimum and maximum listed on the screen you have the freedom to set partition sizes as you wish. Keep in mind that there are minimum space requirements to install XP. Set the size of the desired partition and press Enter.


9. Once the partition has been created you are returned to the screen in Figure 08. If there is still unallocated space on the drive and you want to create another partition, highlight the unallocated space entry and press C again to repeat the partition creation process. If you want to change the partition that was just created, highlight it using the up and down arrow keys and press D. A confirmation message will be displayed. Once you're satisfied with the partition scheme, highlight the desired install partition and press Enter.


10. The final step after creating and selecting the install partition is specifying the file system to use for formatting the partition. The available choices will be shown on the screen that appears as in Figure 09. In most cases you'll want to use NTFS. It's far more secure than FAT32 and supports permissions, encryption, and compression. The only reason for considering FAT32 would be data sharing with W9x/Me installations and since this scenario deals with a clean install it's not even a consideration. 


11. Remember a few steps ago when XP wanted you to insert a CD to prove you qualified to use the upgrade version of XP? What it didn't do was tell you to remove the qualifying version and reinsert the XP installation CD. That time has arrived. Why it doesn't do this immediately after the verification I have no idea, nor will I waste more time on this screen.

12. The XP CD is back in the drive and the partition is being formatted. This part of the process is totally non-interactive and a tad less interesting than watching paint dry - unless of course the paint is the same hideous yellow color as the progress bar.


13. You thought the part where the partition was formatted was boring? More of the same in this section of setup where the files needed for installation are being copied to the hard drive. You'd think at the least they could have changed the progress bar color.


14. Almost there; the configuration is being initialized. This screen has a blissfully short appearance.


15. Finally. A red progress bar that indicates the system will reboot in 15 seconds so the Graphical User Interface portion of setup can begin. If you're still awake, tap the Enter key to speed up that 15 seconds until restart. This is the end of the text portion of setup.


16. This is it - Prepare yourself for what is possibly the longest commercial for a piece of software that has ever been presented, also called the Graphical User Interface phase of XP setup. Click the Onward to Phase II link below.